9 July 2008
 According to archaeologists, cords have been made by plaiting or twisting plant materials since about 17,000 BC, typically nettles, hemp, cotton, sisal and jute. In traditional Māori culture, cord has been made from New Zealand flax, which is probably at least as strong and durable as any other plant material. Before rope began to be made from plastics in the late twentieth century, its manufacture from flax fibre was one of New Zealand’s major export industries.
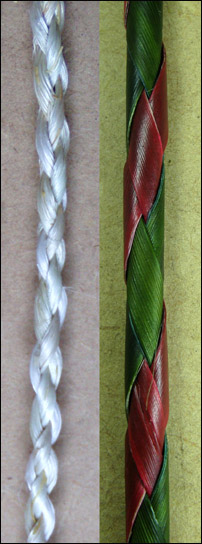 Flax can be plaited from its fibre or from strips, and the photo to the right shows a four-plait made from flax fibre, or muka, on the left side of the photo and one from strips on the right side. A plait made from fibre is a good deal stronger than one made from strips, but plaited strips are much quicker to make and look quite attractive, particularly the four-plait, which can be woven in a tubular shape. A disadvantage of the tubular shape is that it can become crushed if used as a handle for a basket carrying heavy weights, but it’s quite suitable for a small basket and it’s particularly suitable for a pendant.
A number of the participants in my workshops have asked me how to weave a tubular four-plait, and I know of only one flax weaving book — Fun with Flax — that includes instructions. Unfortunately, people have not always found written instructions easy to follow, so I’m not sure whether the instructions below will be easy to follow either. If you don’t find them easy, you won’t be alone. It sometimes takes a while to get the hang of four-plaiting even when it’s taught in person.
 A four-plait cord made from strips becomes tubular because the shiny side of each strip is kept to the outside of the cord all the time as you plait. Start with four flax strips all the same width. As for any cord, it’s easier to get an even plait if you have one end of the work held by a friend or you tie the end around a solid object such as a chair leg or a nail in a piece of wood. This means you can pull the strands towards you as you plait, so you can keep an even tension on the plaiting. Here I’ve used a nail banged into a piece of wood. Arrange the strips so that the shiny side of each strip is showing uppermost.
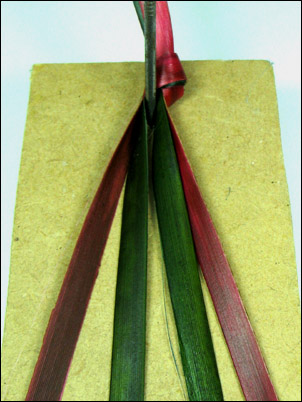
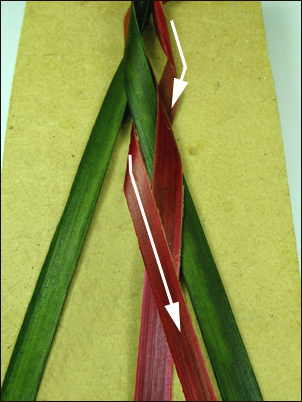
 I’ve used two strips of dyed green flax and two strips of dyed red flax for these illustrations to show the plaiting sequence more easily. If you are using two different colours, arrange the colours so that one colour is used for the two outside strips and the second colour is used for the two inside strips. To start plaiting, grasp the middle two green strips, and cross the left-hand one over the right-hand one, keeping the shiny side uppermost.
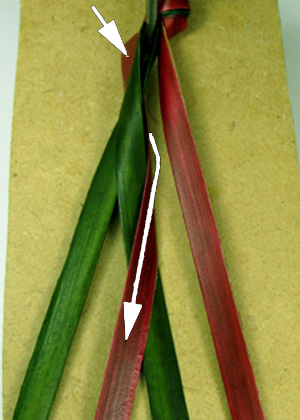 Then take the outside left-hand red strip, and bring it under the two green strips to the right of it, turning it so the shiny side of the flax will be showing on the underneath of the cord. This means that the dull side of the strip is showing at the front. Bring this strip around and over one green strip next to it on the left. The shiny side of this strip should now be showing.
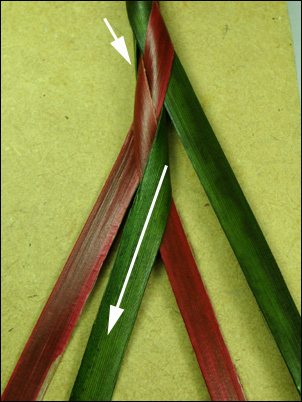
 Go to the right hand side of the plait and take the outside red strip to the left under the next two strips, (one is red and one is green), keeping the shiny side of the flax on the outside of the cord so that the dull side shows on the front. Bring this strip around and over the one red strip to the right of it so that the shiny side of this strip is now showing. Note that the two green strips are now on the outside and the two red strips are in the middle.
These last two steps are now repeated. Note that the first movement of crossing the centre two strips, just before these two steps, is a starting movement only, and is not included in the continuing sequence.
 To continue, go back to the left hand side and take the outside green strip under the two red strips and then turn it back over one red strip, making sure you keep the shiny side of the flax on the outside of the cord as you do this.
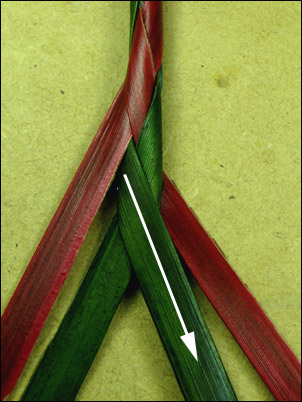 Now go the right hand side and take the outside green strip under two strips, (one is green and one is red), and then turn it back over one green strip. Pull the strips out each side and up so that the plaiting tightens up and the tubular shape and pattern of the cord starts showing. Continue plaiting, pulling the plait up tightly and evenly as you go.
 The nice thing about weaving a four-plait cord with two different colours is that the colours spiral around the cord, giving it a candy-stripe effect, which I find very attractive.
The plait made with flax fibre, or muka, shown on the left in the photo toward the top of this post, is plaited in the same way as the one made with strips but because each set of fibre strands that is being plaited is round rather than flat like a strip, it does have a different look to it.
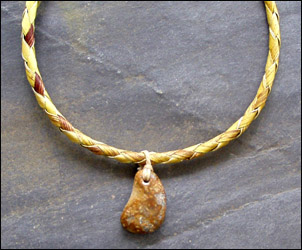
 The necklet at the top of this post has a copper clasp. This is made by winding copper wire tightly around each end of the cord and shaping the wire into a hook on one end and an eye on the other end. To ensure the wite stayed in place, I used a little bit of glue under the wire.
Modification Jan 2010
I have replaced the original illustrations for this post, where I used four flax strips of the same colour, with illustrations using flax strips of two different colours. This is a result of a participant in one of my recent workshops finding it much easier to remember the plaiting sequence when we used two different colours for the plaiting strips.
Modification June 2021
I have added arrows to the illustrations for this technique, to make it easier to see which strip is being moved at each step.
© Ali Brown 2008. Last updated 2021.
Scroll down to leave a new comment or view recent comments.
Alternatively, check out earlier comments received on this blog post when it was hosted on my original website.